Building An API Gateway With Spring Cloud, Security, Netflix Zuul, Eureka And Ribbon Using JWT Access And Refresh Tokens

Elattar Saad
Mon, 20th September 2021
Let’s first define what we’re trying to achieve here before diving into establishing an API Gateway and dealing with sophisticated configuration.
An API gateway is a cloud-based management solution for APIs that sits between a client and a collection of backend services. It acts as a reverse proxy, taking all API requests, aggregating the many services required to complete them, and providing the relevant results.
This article is based on Getting started with Spring Boot: Creating a simple movies list API and Spring cloud: introduction to service discovery using Netflix eureka; Make sure to take a give it a look before getting started with this one.

The API Gateway we aiming to build will have two main jobs to handle:
- The filtering and routing agent will manage request routing based on filtering procedures; a series of filters will determine if the request should be forwarded to the backend services, redirected, or even rejected.
- The security agent (the largest part) is one of the filters that performs a more thorough examination of the authentication and authorisation statuses of incoming requests.
The authentication status determines whether the request sender is a registered user. The authorisation status of a request indicates whether it has access to a certain resource.
For this example I will be using:
- Java version: 8
- Spring boot version: 2.4.13
- Spring cloud version: 2020.0.0
Building the security agent
The security agency will be based on the following dependencies:
- Spring Data JPA and H2 database for storing our users:
- Spring Boot Web to expose endpoints to create users and login them by generating JWT Tokens (we need the JWT library also):
- Spring Security which will handle the user authorisation and authentication:
The Lombok dependency to reduce our boilerplate code:
Then, let's start with a basic config of our server and datasource:
The authentication statuses are based on two models: users and roles, which we’ll develop next; each module will have its own bean, controller, service, and database repository:
The user module
The user bean will be like the following:
You can other data properties if needed.
We name the bean AppUser instead of user to avoid the collision with the Spring Security user which we'll going to use later.
To handle user endpoints we created the following RESTful controller:
The user repository will be as basic as this:
The service layer of this module will be having the following specs:
As you can see, we used the UserDetailsService, which is a Spring Security default service for dealing with Spring Security users. However, because we added our own user schema, we needed additional code to handle it the Spring Security way.
Finally, we need to set and handle our custom exceptions:
The role module
The role bean will be like this:
You can add more attributes if needed.
For this module, we didn't add a controller since the user controller handle the role attribution to users, but you still can add a controller if you need dynamic roles.
To persist our roles, the roles repository handles that of us:
And the role service will handle the logic for us:
And of course we need to set our custom exceptions and a handler:
with that, we are done defining the general schema of our project (domain layer).
Spring Security configurations
Now, it's time to stuff our app with a set of needed configurations aspects, let's start with the password encoder config, the password encoder is the tool the app will use to encrypt our data (mainly passwords).
Inside of a package called "security" we created a class named SecurityBeanConfig.java:
This allows us to use the BCryptPasswordEncoder as our main password encoder, note that there're other encoders like the Pbkdf2PasswordEncoder, SCryptPasswordEncoder and the Argon2PasswordEncoder.
Next, where thing get a bit serious we need a set of configs which will allow us to define:
- Our user service as main user service for Spring Security (I'll develop that even more later).
- The Cross-Site Request Forgery (CSRF) and Server Session states.
- The fully and role-based allowed and prohibited routes.
- The authentication and authorisation filters. Inside the same package, we created another class called SecurityConfig.java containing the following code:
Building the Security filters
In this section we need build our own authentication and authorisation filter in order to control how both processes are executed.
The authentication filter
The authentication filter is the part which will handle the authentication process from the authentication attempt (sending the username and password) to the result which can be a successful or an unsuccessful authentication.
The auth function (line 8) will retrieve the username and password from the request header params, create a token and authenticate using the Spring Security AuthenticationManager.
If the authentication was successful the function (line 17) will be invoked which be charged to get the authenticated user, create the access and refresh JWT tokens and return them as a response to the /login request.
JSON Web Tokens (JWT) are a proposed Internet standard for producing data with optional signatures and/or encryption, with the payload including JSON that asserts a set of assertions. A private secret or a public/private key is used to sign the tokens. Know more about JWT.
The JwtUtils class is a utility class which we created and it has the redundant function such the tokens creation and verification functions.
With that we are done our basic security agent using Spring Security and JWT access and refresh tokens. Now, it's time to configure our Netflix Zuul reverse proxy.
Building the reverse proxy using Netflix Zuul
Starting with dependencies, for this part of our app we'll be using, Netflix Zuul as our reverse proxy, Eureka client for service discovery and Netflix Ribbon as our load balancer:
What we need to do here is to set our routes for our backend services, for our example a GET endpoint /client/hello which return a simple string, this is a separate micro-service registered on our Eureka server under the id hello-client.
Also, for this gateway can fetch the registered micro-service, we need to add some Eureka client config.
And finally to add a load balancer capability to our gateway, we'll add a simple ribbon configs:
Under the config package, we added the following config class.
With that, we are done building our app, let's get straight into testing it!
First, note that a super admin user is created when the app starts under the username "xrio" and password "verystrongpwd", when we login we must receive our two codes:

We will create another user with the name, username and password "admin":

And we assign the ADMIN role to the created user:
Case 1: when token is wrong or expired

Case 2: when token is correct

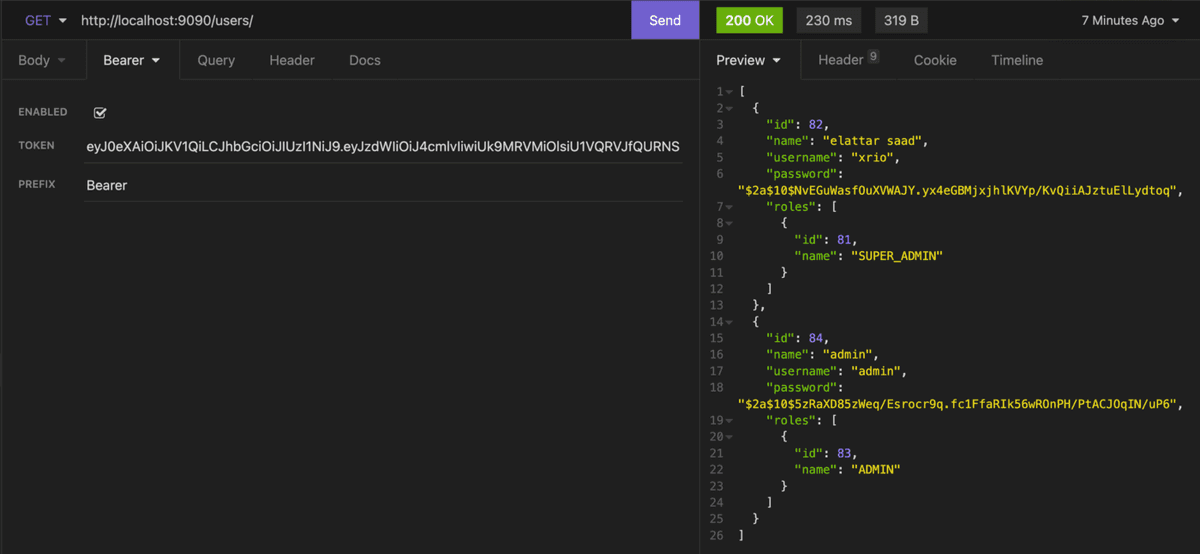
Now, we try to retrieve the list of user which need the ADMIN or SUPER_ADMIN role to be accessed:
Case 1: when token is incorrect
 Case 2: when token is correct
Now, we can try accessing one of the backend micro-services from our gateway:
Case 1: when token is incorrect

Case 2: when token is correct

Finally,
The gateway we built does a good job here, but believe me when I say it needs a lot more configuration for sophisticated behavior in terms of safeguarding and managing traffic to and from the backend services.
Please notice that I skipped configurations such as CRSF and server sessions configs for demonstration reasons and to keep things simple.
Read next
Blossoming Intelligence: How to Run Spring AI Locally with Ollama
In this short article, we'll look at how easy it is to create a chat bot backend powered by Spring and Olama using the llama 3 model.
Sat, 11th May 2024
Read MoreGetting started with native java apps with GraalVM
Native Image is a technology to ahead-of-time compile Java code to a standalone executable, called a native image. This executable includes the application classes, classes from its dependencies, runtime library classes, and statically linked native code from JDK.
Wed, 10th April 2024
Read MoreLeveraging Spring Reactive, Functional Endpoints, Docker, and MongoDB
Blocking is a feature of classic servlet-based web frameworks like Spring MVC. Introduced in Spring 5, Spring WebFlux is a reactive framework that operates on servers like Netty and is completely non-blocking. Two programming paradigms are supported by Spring WebFlux. Annotations (Aspect Oriented Programming) and WebFlux.fn (Functional Programming).
Thu, 29th February 2024
Read MoreNextJs meets Redux: A simple user PoC
Redux is a powerful state management library primarily used in JavaScript applications, particularly those built with frameworks like React. At its core, Redux provides a predictable state container for managing the state of an application in a more organised and centralised manner. It operates on a unidirectional data flow model, which helps in maintaining the consistency of application state and facilitates easier debugging and testing.
Thu, 15th February 2024
Read MoreMonitor Spring reactive microservices with Prometheus and Grafana: a how-to guide
Micro-services monitoring is a crucial aspect of managing modern, complex software architectures. Unlike traditional monolithic applications, micro-services break down functionality into smaller, independent services that can be developed, deployed, and scaled independently.
Fri, 27th October 2023
Read More